CI/CD Pipeline Using Docker and Jenkins
By this time, we all know what Cloud, Digital Transformation and deployable toolchain. But, the main question is, what controls them without the hassle of manually deploying the code to the cloud every time? Is there any way through which a developer can deploy his code automatically to a cloud be it public, private or enterprise architecture for the users to use without wasting any time?
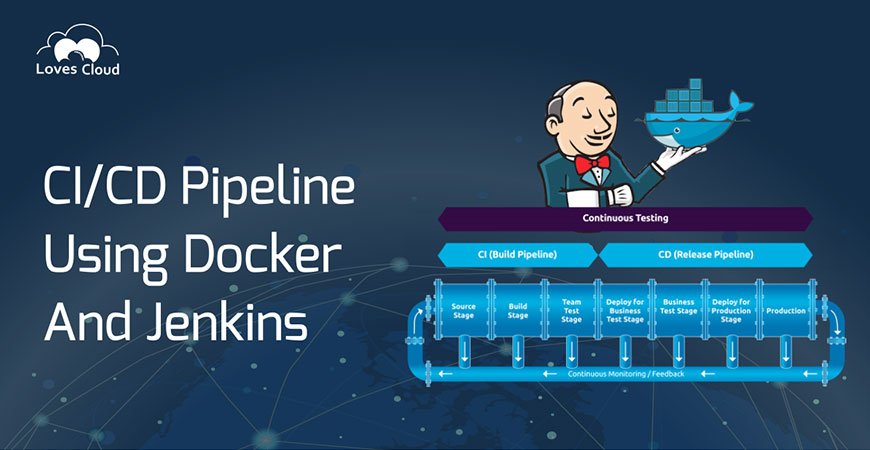
What is CI/CD and why it is so much needed?
Modern software and cloud applications are much more demanding. For a developer to deliver his code to the users and generate revenue is the ultimatum. Thus, CI/CD comes to the rescue. CI/CD revolves around the concept of one being able to write and deploy codes for production, simultaneously. CI/CD or Continuous Integration and Continuous Deployment helps you to generate more revenue in an enterprise application production, by making the code writing and deployment process automatic and effortless. From building enterprise level applications to capital ventures, use of CI/CD always adds more value to your organization.
Using CI/CD pipeline with Docker and Jenkins:
The CI or Continuous Integration part makes sure that a developer is able to send all of his code into the same place and is able to run that using the same process, which not only makes it more secure and easy, but also makes it easy to release a new version of your application. This happens with the concept of being able to commit your code into a single repository.
CD or Continuous Deployment is the part where one can deploy the new codes safely and quickly making sure all the functionalities of the new code are intact. So, we arrive at building a CI/CD pipeline.
Please follow the below steps very carefully, so that we can arrive at our desired result. After following these steps, you will be able to code and deploy your applications with automated accuracy.
Some prerequisites that are to be arranged:
- Git Repository with your application code to be deployed should be available. If you don’t have your code, you can get the sample application code from the following git repo:- https://github.com/LovesCloud/java-groovy-docker/
Feel free to fork the repo in your GitHub account. - Configure GitHub Webhook for Jenkins on your forked repo. Follow the steps mentioned in Configure GitHub Webhook for Jenkins
- To publish Docker image on DockerHub, Follow the settings mentioned in section Configuring Jenkins for publishing Docker image into DockerHub .
- You need to have the Public IP of the Ubuntu Deployment Server with username and password authentication and Docker installed in it, where you want to deploy your application.
- To run Docker image on Deployment Server, Follow the settings mentioned in section Configuring Jenkins for running Docker image on Deployment Server .
Steps to be followed at the GitHub end:
- If you are using your own application code git repo, Create a file named Jenkinsfile a in the root directory and copy the code from our Jenkinsfile and do the following modification as mentioned below.And if you are using our sample code and forked this repo, Open Jenkinsfile in your root directory of your repo, click the ‘pencil’ icon to edit it.
In line,
def dockerImageName= ‘rajnikhattarrsinha/javademoapp_$JOB_NAME: $BUILD_NUMBER’
Replace rajnikhattarrsinha with <your dockerhub username>. - In SCM Checkout stage, Replace the https://github.com/LovesCloud/java-groovy-docker/ with URL of your forked repo.
- In stage, Publish Docker Image,
- Replace “dockerpwd” with “dockerpwd<yourname>”
- In line. sh “docker login -u rajnikhattarrsinha -p ${dockerPWD}” , Replace “rajnikhattarrsinha” with <your dockerhub username>
- In stage, Run Docker Image, Replace IP with your Deployment Server Public IP at all places and commit the changes.
- In stage Run Docker Image, replace devops with your ubuntu server user at all places.
- Open xml from root directory, click the ‘pencil’ icon to edit it,
Replace line <finalName>demopipeline_rajni</finalName> with <finalName>demopipeline_<yourname></finalName> and commit the changes.
Steps to follow at Jenkins end:
- Open your Jenkins.
- Click New Item link on left panel
- Enter an Item name like <yourname>_pipeline
Note: PLEASE DO NOT INCLUDE CAPITAL LETTER IN THE NAME IN STEP-8
- Select Pipeline
- Click OK
- Select General Tab, GitHub Project as <repo to be deployed>
- Under Build Triggers section, Select GitHub hook trigger for GITScm polling
- Under Pipeline section, Select Definition as “Pipeline script from SCM”
- Select SCM as Git
- Enter Repository URL as <repo to be used>
- Keep Script Path as “Jenkinsfile”
- Click Save
- On Left Panel, Click on Build now
- View the Pipeline being built and showing Stages.
- Once all stages are successfully completed. Click on the latest triggered build number from left panel.
- View Console Output.
Verifying the Deployed application:
- Take the Public IP of your Deployment Server.
- Open any browser
- Type http://<Public IP of Deployment Server IP>:8082/<file name of the war given in pom.xml>
- Hit Enter;
Steps to follow for making automated CICD pipeline:
- On GitHub end, edit pom.xml, Change the name of the war file name again of your choice and Commit the changes.
- Open the Jenkins end, Open the Job Details page and observe that the build is triggered automatically as soon as you committed the file in GitHub in your repo.
- View the Pipeline being built and showing Stages.
- Once all stages are successfully completed. Click on the latest triggered build number from left panel.
- View the Console Output
The complete log of the steps involved in successful building of job are displayed.
- In order to view the latest deployment, repeat the steps mentioned in section Verifying the deployed application above and use the war file name you gave in step 23.
Configuring Jenkins for publishing Docker image into DockerHub
- Navigate to Credentials in Jenkins opened in browser
- Click “global” link in section Stores scoped to Jenkins
- Click Add Credentials link
- Select Kind= Secret text
- Enter Secret =<Type the docker hub password>
Note: If your dockerhub password has $ character in it, please prefix it with \ (backward slash)
- Enter ID as “dockerpwd<yourname>”
Note: please keep value as mentioned. This is used in pipeline script. - Enter Description as “dockerpwd<yourname>”
- Click OK
Configuring Jenkins for running Docker image on Deployment Server
- Navigate to Credentials in Jenkins opened in browser
- Click “global” link in section Stores scoped to Jenkins
- Click Add Credentials link
- Select Kind= Secret text
- Enter Secret =<Type the deployment server password>
Note: If your deployment server password has $ character in it, please prefix it with \ (backward slash)
- Enter ID as deploymentserverpwd
Note: please keep value as mentioned. This is used in pipeline script. - Enter Description as deploymentserverpwd
- Click OK
Configure GitHub Webhook for Jenkins
- Open GitHub
- Navigate to Git Repo;
- Navigate to Settings of repository
- Click Webhook
- Click Add Webhook
- Enter Payload URL-http://<Public IP of Jenkins Server>:8080/github-webhook/
- Click Save Webhook
At Loves, we have gained expertise in building CI/CD pipeline that enables our clients to code and deploy their applications with accuracy. To bring about digital transformation in your organization using new-age software tools and boost your revenue generation in an enterprise application production, reach out to biz@loves.cloud.